Showing posts with label Halloween. Show all posts

Sunday, 30 October 2022

Graveyard Cupcakes

These were a big hit last Halloween, I made something different this but kept getting ask about last years so here they are :) I've made choc mint ones by adding a couple drops of DoTERRA peppermint to both the cake mix and frosting mix. 

Another version I’ve done is with chocolate ganache or butter icing and ground cookies to resemble dirt. (recipe below)


Graveyard Cupcakes

Ingredients

Cake;

175 g all-purpose gluten-free flour

1 tsp bicarbonate soda

A pinch of salt

50 g cocoa powder

225 g coconut sugar (vegan brown or regular sugar will work too)

275 ml hot water

60 ml sunflower oil or other mild-tasting vegetable oil

2 tsp apple cider vinegar


Butter Icing;

225g vegan butter 

350g icing sugar

1 Tbls non-dairy milk (optional)

Any food colouring (add one drop at a time as you don't need much)

If wanting chocolate butter icing add in 30g cocoa powder.


Decoration;

Vegan chocolate bits

Graveyard mold

Green vegan food dye (I used yellow too for a more Fall look)

Shredded unsweetened coconut


Method

Preheat the oven to 180c. / 350f. and line a muffin tray with 12 cases.

Mix the dry cake ingredients together until well combined.

Stir in the remaining wet ingredients until the mixture is smooth and lump-free.

While cake is cooking you can double broil your chocolate pieces until melted, pour into mold and then refrigerate until needed. You can also prep the coconut but mixing a few drops of food color in a bowl with the coconut until the desired color has formed and then set aside.

Divide the mixture equally between the 12 muffin cases/or greased tin and bake for 15-20 minutes.

Use a cake tester or skewer to test the middle of the cupcakes come out clean.

If not, bake for a further 5 minutes.

Once cupcakes have cooled to room temperature make the icing.

In a large mixing bowl add the vegan butter (at room temperature) and sifted icing sugar and beat until mixed.

Add any food colouring you like and beat until mixed.

If too thick add the milk slowly. Either spread onto cupcake with a spoon or knife or pipe.

Pipe onto cupcakes, place upside down in the bowl of coconut and gently shake excess.

Once all cupcakes have icing and coconut then remove the chocolate gravestones from the fridge and place one in each cupcake.

Refrigerate until eating as the butter icing can easily melt.


Version 2

Replace the butter icing with chocolate ganache

1/3 cup non-dairy milk

2/3 cup vegan chocolate bits 

2 Tbls maple syrup/agave/date syrup

Vegan GF chocolate cookies or crackers (I used about half a box of the ones below)


Method

Blitz crackers in a food processor until resembling breadcrumbs, then set aside.

In a small sauce pan heat the milk until hot but not boiling. Add chocolate bits and syrup and stir continuously until completely melted. Set aside to cool to room temperature before using. 

Once ganache is cooled place cookie crumbs in a bowl and spread a small amount of chocolate on a cupcake and push down in the cookie crumbs.

Refrigerate before serving and when ready to serve push the gravestones in. 

*the fondant version is just the butter icing version with a small disc of fondant on top - I had a spider press mold.


Sunday, 1 November 2015

Vegan Halloween 2015

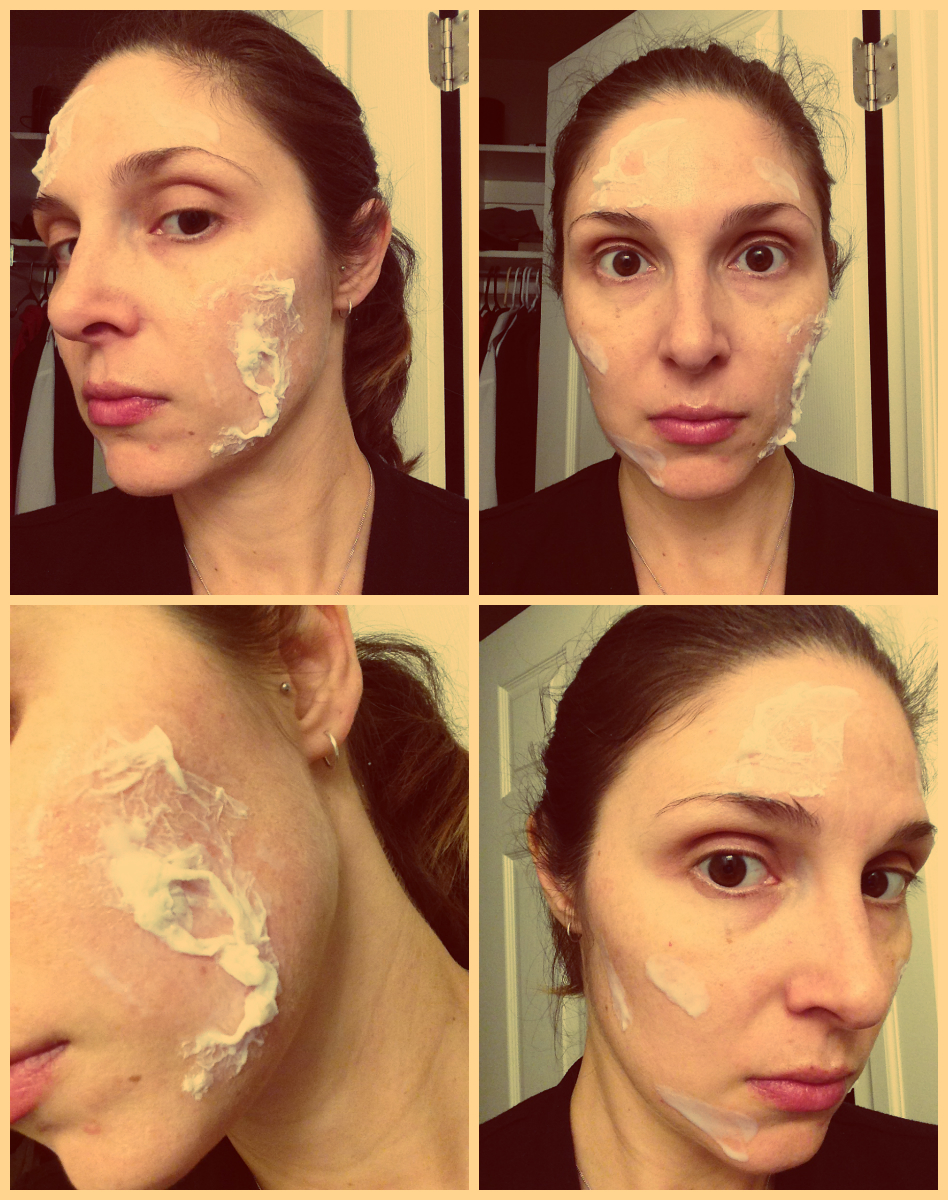
This is really just about my zombie-mom make up.


The shirt was really easy. I bought a tight maternity shirt and a doll from the thrift store that had hard arms/hands that I could detach from the soft part of the body. I painted my arms grey to get that zombie look.
I ironed on some patches to the inside of the shirt for extra strength and then cut holes, smaller that the arms and then push through.
I poured some fake blood (you can make it yourself with food coloring and corn syrup) over the edges of the arms and then quickly held the shirt up and left it on a hanger so the blood ran downwards.


For the zombie face I used craft glue in some spots by itself and some parts with one layer of tissue stuck to it. Once the tissue is on there you can make holes, scars, cuts etc but using your fingers or a tool. The parts that are just glue, let them dry slightly, then run your finger beck over them so there's kind of a hole in the middle, it looks like rotting flesh.


Once everything is dry - around 30 mins or so you can apply make up. I just used eye shadows (black, grey, purple, maroon and green) to get the dead skin look and then black under the eyes, around the edges of the face and along the lines in my face. The purple, maroon and green work well over the fake scars to give the look of bruised, rotting flesh. The middle of the sores I used black food coloring on a Q-tip to show depth, then the final touch was red food coloring on a Q-tip for the blood on the sores, and fake blood for inside the mouth, tears and nose bleed. I just colored my hands with the grey eye-shadow, using the black to contour around the bones. I used black food dye for my finger tips which I regretted later because it does NOT come out from under your nails LOL

I think it turned out pretty well since I had no clue what I was doing. Apparently I was so scary that our neighbor's kid wouldn't come to the door ;)


Sunday, 12 October 2014

Halloween Totes

Obviously you could use this for any tote, I just happen to be making Halloween themed ones for my girls. I think they turned out really well considering it was only my third time using the sewing machine - clearly they are very easy!


I bought 1 yard of the candy corn material and 0.6 yards of the pictured material and that had two different pictures. I made two bags with that amount.

Halloween Tote
(Makes 1 bag)

What you need;
1/2 yard of patterned fabric (candy corn)
1 fabric picture
2x 22"x4" fabric (for the handles)
Filling (if you want your picture to puff out) - I used Crafter's Choice Polyester Fiberfill
fabric scissors
sewing machine
pins
a piece of cardboard for the base of the tote (optional)


Instructions

1. First cut the fabric for your bag and the lining, cutting them together will ensure the exact same size.


2. Cut the handles to size if not already correct.
I made the handles first.
Fold handle fabric in half longways, pattern side in and iron them flat.
Sew down the edges of the fabric and then turn the fabric inside out (which is really the patterned side up). 
Iron the handles flat and set aside.


3. Grab the patterned fabric and fold in half, pattern side in and iron.


Turn back out flat and grab the picture fabric.


 Cut the corners off the side of the picture fabric so that you can fold them back behind the picture.


 Iron in place.


 Pin in place on the patterned fabric and sew down every side but one. 


If you are not using stuff then you can sew all sides.
Push in the stuffing to how you like it and sew down the final side.


4. Fold the patterned fabric in half again, pattern side in, and pin the left and right side together.
Sew those sides together.


Fold the bottom sides in an perpendicular angle to the sides and pin.
Sew them together and turn the bag inside out so the pattern is on the outside.
Repeat the step 4 for the lining.


5. Place lining inside the bag, seams should be facing each other.
If you like you can place a piece of cardboard or plastic in before you put in the lining to flatten the bottom.


 Fold the lining and the patterned fabric in towards each so they both have a hem and iron before pinning together.


  Before sewing place the handles in between the hems wherever you'd like them to be and pin in place.
Leave a small gap on either side of the hems where the seams meet and you can sew this last.
Run the sewing machine over the hems and the handles.
If you like you can make an "X" over the handles to ensure they will hold heavy items.


 6. Lastly pin together the end hems and sew together.


Cut all lose threads and feel proud :) 


Halloween Bunting


Since having a beautiful sewing machine given to me last Xmas this lame child's shirt (see below-shameful!) was all I've been able to muster so I decided I needed to start practicing.
Bunting seemed like a pretty easy task so I started with that!


I bought a bunch of quarter yard pieces of Halloween themed material scraps, some pinking shears and some ribbed ribbon.

I made a template on a peice of paper, it was a diamond shape because I wanted a flap on top to turn over on the ribbon. Then I traced it onto all the different fabric and cut them out, using pinking shears on the "V" and just regular fabric scissors on the back part.


Then I decided where I wanted them on the ribbon and ironed the flap down and fasted it with a pin.


Then I used the sewing machine to run a line down the ribbon - during trial and error I discovered that the criss cross stitch to be the nicest to look at and easiest to use.


I sewed the ribbon together at the end to make a loop because I attached them to the wall with nails.


The End :)