Showing posts with label gifts. Show all posts

Wednesday, 18 December 2024

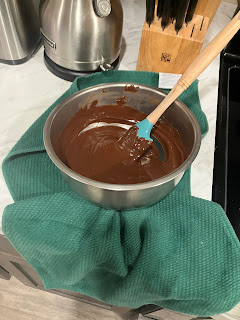
Chocolate Holiday Bark

Chocolate bark is a lovely gift for the holidays! You can use whatever nuts and fruits you like or have on hand. We save peppermint bark for after the holidays since the candy canes are on the tree ;)

I made three batches, which used three trays and 6 packets of chocolate chips. These were gifts for 30 coworkers.


Chocolate Holiday Bark

Ingredients

Vegan choc chips of choice (I used Enjoy Life)-2 10oz bags for each large cookie tray.

Pistachio pieces 

Slivered almonds or almond pieces

Pine nuts

Cranberries

Dried apricot 

Pecans pieces


Method

Line your tray with parchment or wax paper.

Have your ingredients ready to go.


Use a double broiler or a stainless steel bowl that fits snuggly over a saucepan full of boiling water.
Once water is boiled add chocolate chips to bowl and stir occasionally until completely melted.


Remove from stove and wipe any condensation off the bowl with a hand towel. If water gets into the chocolate it will become grainy.


Pour directly onto your lined tray and smooth out with your spatula.
Sprinkle your ingredients over the bark and once you're happy with it transfer it to the refrigerator for 10 minutes. Once completely hardened you can take out of the fridge and use the parchment paper underneath to flip up the edges and crack the chocolate into pieces for serving or packing. You can always 


This is how I packaged it - in sealable bags with a handmade gift tag.


With a fancy vegan white chocolate drizzle.


Monday, 9 January 2023

Stove Top Potpourri

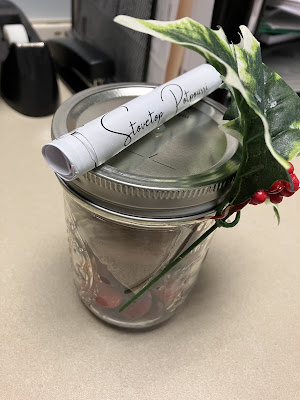
 This was a super cute holiday gift from a colleague at work (her IG below). So simple and made the whole house smell like the holidays :) Check out @southerlyhome for other beautiful home inspiration!

Stove Top Potpourri 

Ingredients

1/2 cup cranberries
2 oranges/clementines
4 sticks cinnamon
3 Tbls all spice
2 tsp nutmeg
Mason jar
small zip bag (jewellery size)
Instructions for the receiver.
Decoration-holly sprig, butchers twine (optional)


Instructions
Place the loose spices in the small Ziploc bag.
Add oranges to the jar, followed by the cinnamon stocks and cranberries.
Add the spice bag last.
Seal jar and decorate as desired.
Print out the instructions (below), scroll and hot glue them to the lid.


Wednesday, 21 September 2022

Gold, Frankincense & Myrrh Soap

I wanted to make a soap for Christmas gifts that I'd never attempted before....Gold, Frankincense and Myrrh. The only problem is Frankincense and Myrrh essential oil is SOOOO expensive and it doesn't really smell like much besides earthy. So this is my Christmassy version! The 24k gold sheets and flakes weren't really that expensive at all. I got mine from Walmart and made sure they were food grade. I have just included basic instructions below. If you are new to soap making please make sure you follow regular instructions and protocol, I have not included them here but you can find it on my soap making tutorial. I estimated $170 for the block which is around $12 a bar depending on how small you cut them. I usually get around 14 bars. So to sell this would be quite expensive but as this is for homemade gifts it's not too bad. By far the most expensive soap I've ever made!


Gold, Frankincense & Myrrh Soap

Ingredients

201g Lye
543g Distilled water
435g Coconut oil
507g Vegetable Oil
507g Olive Oil
15ml Frankincense EO ($75)
7ml Myrrh EO ($34 wholesale for 15ml)
7ml Clove EO ($9 wholesale for 7ml)
10 drops Cinnamon Bark EO ($3)
1/2 tsp ground glove
30 24k Edible grade Gold sheets (for the top of the soap) ($20)
4g Edible grade Gold flakes (for inside the soap) ($16)


Method

Please follow regular soap making instructions and protocol.

I added oils to ground clove ahead of time to have the clove soak up the scent, it helps it keep for longer.
Once soap hit trace I adding in the flakes and oil mix and used the mixer I use for soap making to break up the flakes into tiny particles.

Once poured in mold I tried to fold the gold sheets on the top and then pressed them in a bit to get a crinkle effect.

The next day when I went to cut the soap I did notice that the sheets on the top were a little oily and had some orange residue.

I will wait the six week curing period before I take final pictures and also test the PH balance to make sure they are safe to use.


Sunday, 29 October 2017

Xmas Spice Soap - 2017

Xmas Spice Soap is now available! A blend of Pine Needle essential oil and Cinnamon Leaf essential oil combined with scent holding ingredients ground clove, ground pine & ground cinnamon! This is a beautiful homemade gift for the holidays! 


Also now selling Homemade Soap Dishes! It's important with handmade soap to have enough airflow between uses and these pine wooden dishes double coated with mineral oil do just that!


Also available any soap and dish gift wrapped! Just mention it in the notes!


Shipping 

Shipping in the US is standard for 1-2 bars of soap. If you are buying more than 2 items PLEASE MESSAGE ME before you check out as I can get you a much better rate on shipping.

If you live in Australia and want to purchase at local rates you have the option to buy before November 2nd PLEASE MESSAGE ME and I will send you a private sale as I will be in Australia during November!

Get your 5 star rated soap while it lasts!


Wednesday, 16 December 2015

Homemade Xmas Gifts - 2015

Just a quick look at the homemade gifts I sent to family and friends this year;


Here's some more inspiration from my Pinterest page...


Sunday, 25 October 2015

Sewing a Simple Quilt

Quilts are much easier than they look. It's just step by step instructions, I'm a complete novice seamstress and I just follow YouTube videos!


Sewing a Simple Quilt

What you will need


  • Fabric of your choice - the amount will depend on how big you're intending to make your quilt. If you're using traditional quilt squares they are around 9.5" squared. I bought around 3 yards of fabric for a baby crib quilt. Whatever you use for the front you need the same amount for the back (if you are planning on using this fabric as your finished edges then you need to make sure the fabric is a few inches longer and wider than your front piece because you will be flipping it up over the front. NB: If your item is something that might get washed occasionally make sure you pre-wash your fabrics.
  • Sewing machine, obviously :)
  • Matching thread
  • Fabric scissors
  • Iron
  • Pins
  • Thick ribbon (optional)
  • Batting - thickness if up to you, mine was a little too thick!
  • Fabric adhesive spray

Instructions

Cut your fabrics using a square quilt ruler (around 9.5") or cut by hand but be precise.


Place your squares on the floor and arrange in the order you want them. Take the first two pieces and place them pattern facing each other, pin down on the side you are going to sew. Iron if needed. Sew a 1/2" seam allowance to attach them. don't forget to always back stitch at the beginning and end of every line of sewing.


Iron out the flaps that you've just sewn. this is very important to reduce the bulk in the quilt.


Continue until you have one row of squares done.


 Place all your rows in order somewhere flat. Repeat until all your rows are finished.


Lay your rows out flat in the order you want the quilt to look.


Flip the second row up over the first row so patterns are touching.
Continue for the other rows, flipping every second row.


Sew a 1/2" seam allowance along the top of the rows.
Iron flat the flaps you've just sewn. Repeat for all the rows.


Now join the larger pieces together in a similar way by flipping up the second piece onto the first, patterns facing each other, and sewing a 1/2" seam allowance, then ironing down the flaps.
Repeat for however many more pieces you have.


Now you have the top part of your quilt! Place it on your batting and cut to shape.
If you are using one solid piece of fabric (which is the best way), then cut that to size too. If you are using quilting squares then repeat all the steps above until you have the top and bottom of your quilt. I did this just out of necessity to use up old material.
Once you have your quilt fabric on the batting smoothed out spray the fabric adhesive on the under side of the fabric (non-patterned side) and lay flat on the batting, smoothing out any wrinkles. I usually do one half of the fabric at a time as shown below.
Repeat for back of quilt.


Now you're ready to sew the quilt together with the batting! With your front fabric facing up as your guide, sew carefully down each line, the line that connects the fabric squares, from one end to the other.
repeat for all lines down, then all lines across.  


Once this is done you are ready for your sides, you can trim extra batting if you like.


I used a large ribbon (3" wide) but if you see the quilt at the bottom of the post I used just fabric. If using fabric, as mentioned at the top, you will just have a longer and wider bottom piece of fabric (by about 3-4"). In this case you will just fold the pieces twice (like a hem) and flip over the front, you can iron them first to keep the fold. 
In my case I used a 3" wide ribbon and ironed them in half so they were even. Then I sprayed the inside of the ribbon with adhesive, pinned it down and sewed the two long sides. For the small edges I sewed the ends into points and then sewed the ribbon over the top of the other ribbon at the corners. 


I didn't mean to have that many rows of stitches but I messed up the first side (by not ironing them in half!!) and so had to match the other sides :/


 Finished quilt!


This was only my second quilt. The first one  made was a throw for the couch...


Friday, 15 May 2015

Teacher's Gift Basket

If your kids school is anything like ours about this time of year they send home "suggestions" of what you should give the teachers as an end of year thank you for looking after your brats all year. Some of the suggestions included notebooks and pencils....lame! I prefer the personal touch...they want to relax in their time off not be reminded of the year to come!


Basket from thrift
Homemade Card

Check out my DIY page and Gift tag for more ideas!

Saturday, 14 February 2015

Valentine's Day 2015

Or as my children say "Valentime's Day" lol. Sometimes it's a family affair rather than a romantic night out!

Heart Shaped Pancakes using Instant Pancake Mix and a ketchup bottle.


Delicious vegan milk chocolate hearts filled with vegan truffles. YUM!
Chocolate by Sjaak's, bought from Natural Candy Store.


The card I made for my husband, just stamps on the bottom and a water color heart on top with stamped lettering.


Handmade card my husband made for me...he knows I'm obsessed with the Fleur de Lis LOL


Inside the card...


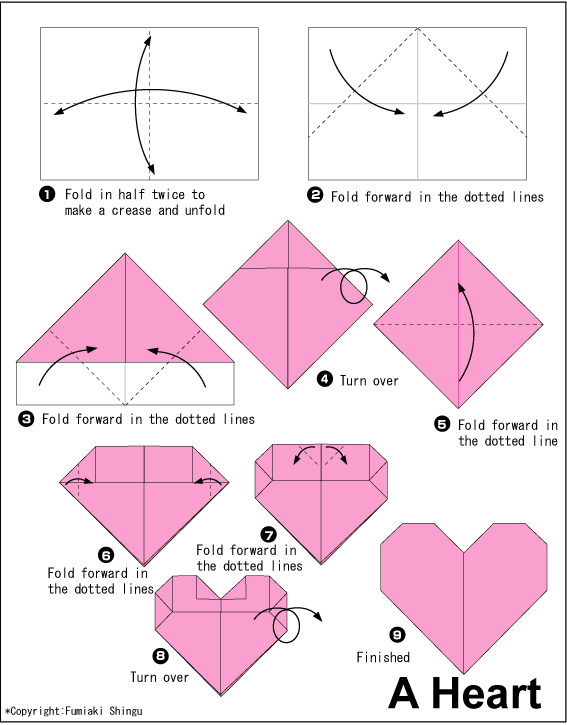
Origami hearts that are so easy to make that the kids helped!